My Best DIY Home


We collect the best do it yourself images. All the images are collected from Pinterest. If you have images that is originally owned and if you want to shut it down, please contact with us at with your ownership proof, we'll take action shortly.


DIY Recycled Storage Ottoman

Storage ottomans are fantasticly functional pieces of furniture.  Here's a way to save some money by making your own:
Materials & Tools:
- Old ottoman (purchased from 2nd hand store)

- Enough fabric of your choosing to re-cover the outside of the ottoman

- Black fabric to line the interior of the ottoman
- Plywood
- Screws
- 2 med-duty hinges

- Drill
- Screwdriver
- Staple-gun
- Sewing machine

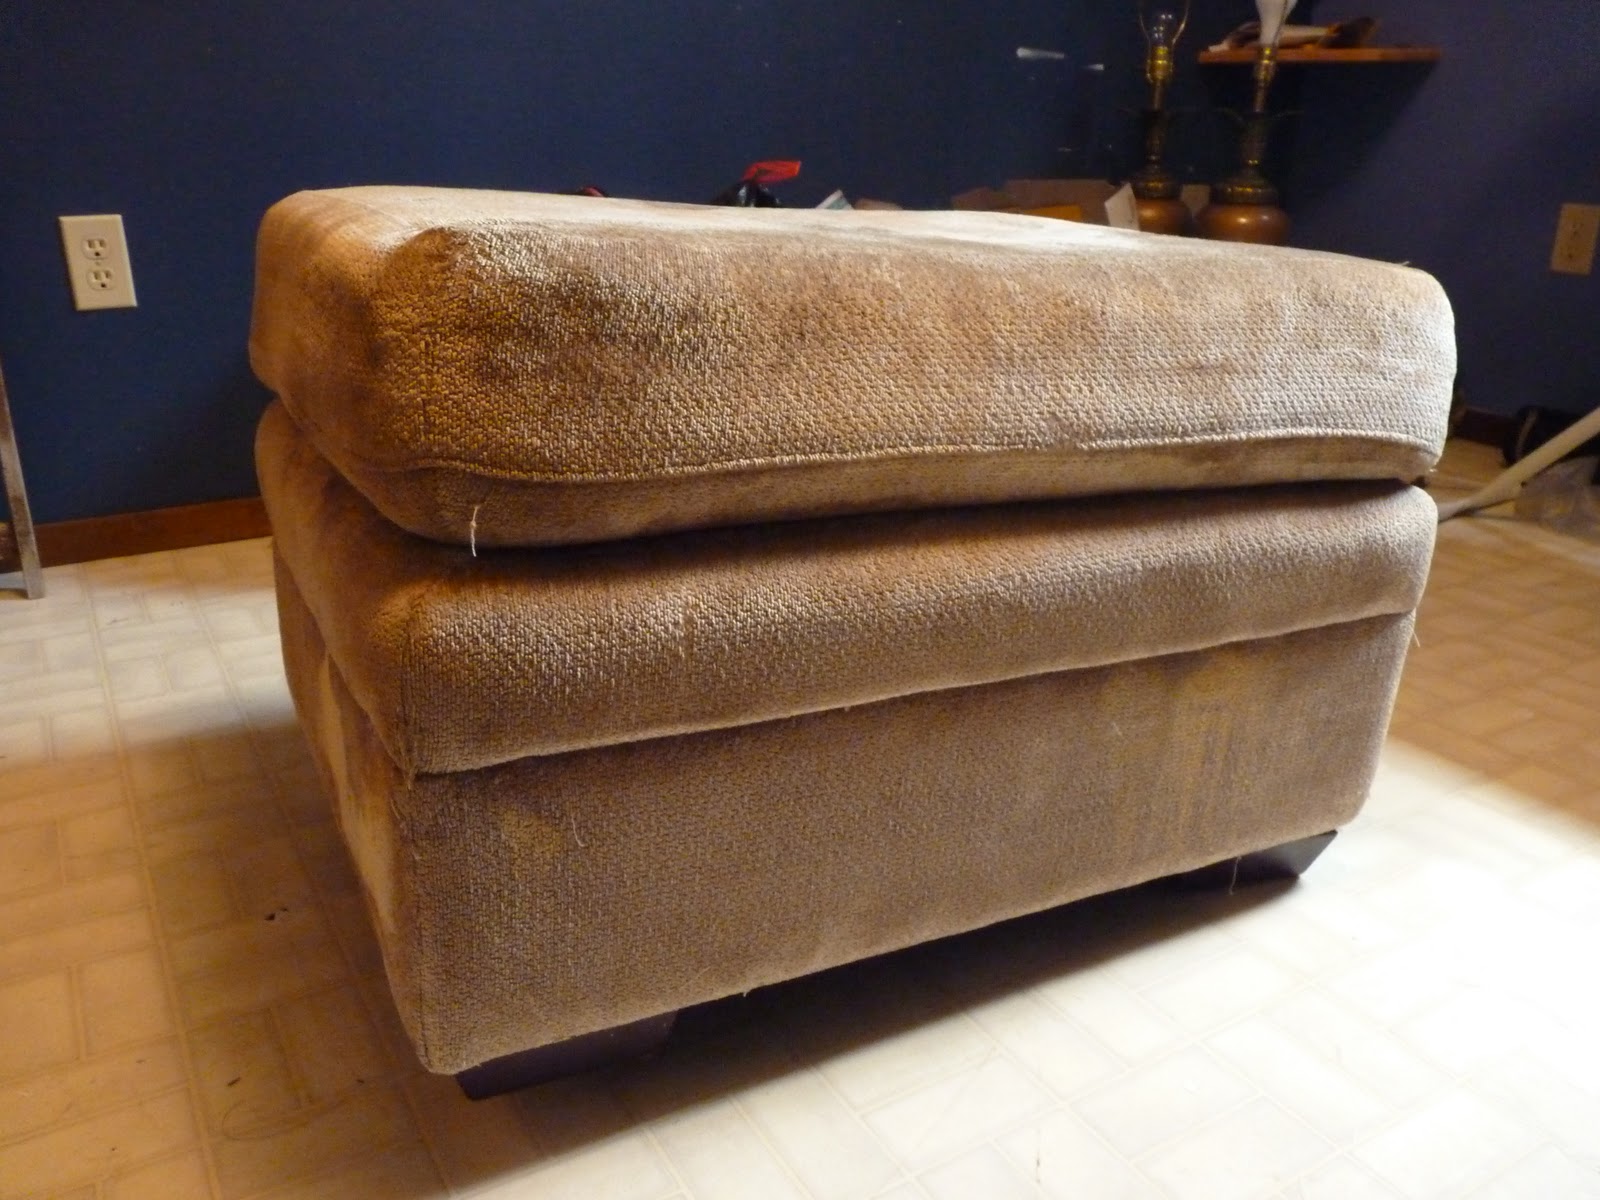
1) Purchase an inexpensive ottoman from a 2nd hand store with a sturdy frame (doesn't really matter what the outside looks like).  Remove the legs and set aside.


2) Proceed with the first couple steps of basic upholstering: starting from the bottom, remove the staples from the fabric and furniture and remove the fabric covering - taking careful note of how you pull it off (because you're going to put the new fabric back on in more or less the same way.)
3) Remove top padding, and top covering - revealing the empty inside of the ottoman:

4) Measure the length and width of the bottom of your ottoman.  Cut plywood to fit.  (The thickness of your plywood will depend on how strong you want the floor of your ottoman's interior to be, and also what kind of legs you have for your ottoman.  In this case, my legs had fairly short screws, so I needed my plywood to be strong as possible, but also slim, so I chose to go with 1/4" hardboard.?)  Position your piece of plywood on the bottom of your ottoman, mark and drill holes of appropriate size to fit your legs.
Screw legs into position to make sure everything fits, make adjustments if necessary.
5) Using legs to hold plywood in place, drill holes around the outside perimeter of the plywood, and secure to ottoman frame with screws.

6) Remove legs once again and set aside. Proceed to upholster the main body of the ottoman, by separating the pieces of the old fabric at the seams, ironing them out, and then using the old pieces of fabric as a pattern from which to cut out your new fabric. You may need to extend the new fabric at the top by a few inches to ensure that you will have enough to wrap around into the inside top opening of the ottoman frame (because it will no longer be connected to the top padding in order to allow the ottoman to open and close). Sew the pieces of new fabric together in the same way the old fabric covering was (leaving out the pieces connected to the top padding), place on ottoman body and secure with staples on bottom, and inside the top opening of the ottoman frame.
7) Replace bottom covering and legs.

8) Measure the length and width of the top padding of your ottoman.  Cut a piece of plywood slightly smaller than your measurements.  You may also need to trim back the corners of your plywood slightly on an angle if your top padding does not have perfectly square corners.  ?

9) Separate pieces of old fabric covering from the top padding cover of the ottoman at the seams.  Iron out pieces and trace onto new fabric.  Cut out new fabric pieces (you may need to leave a couple of extra inches at the bottom edge to help secure padding to plywood.) and sew back together in the same manner as the old covering.

10) Place top padding into new fabric covering.  Place cut piece of plywood on top, and tightly secure the fabric around the perimeter of the plywood to the plywood with staples.


11) Cut a piece of black lining fabric and stable to bottom of ottoman top to cover plywood and fabric edges.

12) Measure length and height of each of the interior walls and floor of the ottoman, adding enough for seams.  Cut out pieces of black lining fabric in accordance with your measurements and sew a case lining for the interior of your ottoman.  Place inside of ottoman and secure to ottoman frame around upper and lower perimeters with staples.


13) Position and secure hinges with screws to outside edge of ottoman lid (on the plywood).?  Position and secure remaining side of hinges to ottoman box frame with screws, checking to make sure that lid will fit correctly on the ottoman box when closed, adjust if necessary (You may need someone to hold the ottoman lid for you while you do this).


Enjoy!

Credited to the Author

Re-Upholstering Furniture Part 2: Upholstering

Materials:

- Old piece of furniture
- butter knife (totally professional tool I know - but it works!)
- flat-head screw driver
- pliers
- staple gun
- hammer
- sewing machine
- regular and zipper foot
- seam ripper
- upholstery fabric
- plastic piping
- iron

I'm not a pro at this by any means (in fact this was my first attempt), but here's what worked:

The basic rule of thumb is that you work one section at a time, take off the old fabric in whole pieces, then use those pieces as a pattern for your new pieces. Pay attention to how things come off - because you'll put the new pieces back on the same way.

1) Remove Staples:
Starting from the bottom of the furniture, remove the staples using your butter knife, flat-head screw driver, and pliers (safety goggles are a good idea). Remove bottom covering (keep aside until later), and release the rest of the fabric from the bottom of the furniture frame.

2) Remove Fabric Section:
In this case I began by loosening the side sections and removed the back piece of fabric from the chair frame (put aside with metal stretchers), and then removed the lower-front section of fabric, saving any pieces of piping that also had to come off. If any piece is sewn directly onto the furniture, you may need a seam ripper to release it.
3) Iron Out Old Fabric Section & Trace:
Once I had the fabric piece removed I ironed it flat, and then traced it out exactly onto my new fabric. Cut out new fabric piece. (If you're using patterned fabric - make sure you have your piece in line with the direction of the fabric pattern before cutting it out)

4) Attach New Fabric Piece:
Place new fabric piece on furniture frame in place of the old one and sew/ staple to frame in the same manner as the old one.


5) Repeat with other sections:After replacing the lower-front piece, I worked on the sides next. In this case the side pieces consisted of 1 whole jacket composed of several pieces sewn together. I removed the entire jacket and used my seam-ripper to detatch the pieces from one another.

Then I ironed each piece out, traced it out onto my new fabric, sewed them back together in the same way, replaced the jacket onto the side of the chair and stapled into position on the frame.

Piping:

To make piping:

1) Remove plastic piping from old fabric sleeve (if piping cannot be re-used, cut a new piece of piping to the same size).

2) Cut a piece of new fabric long and wide enough to make a new sleeve for the piece of piping. Fold in half lengthwise and iron to crease. Sew sleeve just narrow enough to fit piping snuggly.


3) Insert piping.


4) Sandwich between right sides of fabric pieces with piping on the inside - raw edge to the outside and pin in place.


5) Sew pieces together using a zipper-foot on your sewing machine.


After I completed the sides, I repeated the process with the upper-front section, and then the back piece.


Using Fabric Stretchers:

Again the rule here is put it back on the way it was, so take careful note when you pull it off. Position fabric stretchers on back side of fabric pointy side down, and poke through material.

Fold fabric over, position on frame firmly (right side up) and hammer in, stretching fabric across the back.


6) Replace Bottom Covering:


Staple bottom covering onto furniture frame the way it was - tucking in any loose ends.

7) Enjoy your "new" furniture!


Credited to the Author

Re-Uphostering Furniture Part 1: Refinishing Wood

Old furniture can become new again, but I won't lie - it takes time and effort.


Currently, I am re-upholstering 2 mis-matched arm-chairs that a client found for cheap at a 2nd-hand store. By the time I am finished they be new matching chairs.

First we had to make the wood legs match which required refinishing.

*The following steps can be used to re-finish any kind of wood furniture*


Tools & Materials:

- safety googles
- Flat-head screw-driver and needle nose pliers (to remove upholstery staples)
- electric palm sander
- detail sander (for fine detail)
- heavy and fine grit sand-paper
- wood conditioner
- wood stain
- paint brush
- lint-free rag
- varathane/polyurethane finish


Step 1: Pull old fabric away from legs to fully expose them.


If the piece you are working on needs to be re-upholstered - do not remove fabric sections entirely (you will do that later), just pull it back enough to fully expose the wood. Be careful not to damage the fabric pieces too much, and keep whole pieces as intact as possible.

Be sure to wear safety googles when pulling upholsetry staples - sometimes they can really fly!


Step 2: Sand off old finish.


Here's where a lot of the work in refinishing furniture comes. To do it properly, ALL of the old finish needs to be removed - which means you need to take everything including every nook and cranny right down to the wood. (if your furniture has a lot of classic details - you will need a detail sander to do this)

To make this a little easier I like to start with a heavy grit sand-paper which takes the old finish off quickly. Once the old finish is removed the wood will need to be sanded again with a fine grit sand-paper to smooth everything out.

Once all sanding is complete, brush sawdust off of wood, and clean wood with a damp rag. Clean up all sawdust in surrounding area, and allow wood to dry thoroughly.

Step 3: Pre-treat wood with a wood conditioner.


Follow instructions on label.

Step 4: Apply wood stain.


Do not shake stain to mix - stir. If you're working on a large project, you will need to stir your stain several times during the job to maintain uniformity. Once your stain is adequately mixed, use a paint brush, or in this case foam brush to paint the wood with a coat of stain. More recently I have become a fan of water-based stains because I find they saturate well, and they clean up with soap and water, which just makes life easier.


Let the stain sit for no more than 3 minutes. Dampen a lint-free rag with stain, and rub on wood in the direction of the wood grain. Allow to dry (at least 2 hours). Repeat process with additional coats until desired colour is achieved (in this case I only needed 2). Allow to dry thoroughly.


Step 5: Apply protective finish.


In a well ventilated area, cover wood with a clear varnish. In this case I applied 2 coats of an aerosol Varathane. Allow to dry thoroughly according to directions on label.


Credited to the Author